DTF gangsheet building is a practical skill that unlocks efficiency in Direct-to-Film production, letting you fit multiple designs on a single sheet with speed and precision while maintaining consistent color and texture across batches. As outlined in a DTF printing guide, you can plan layouts in a grid, position designs with careful margins, and align artwork to streamline your heat press workflow, thereby reducing reprints, waste, and downtime. This beginner-friendly gangsheet tutorial walks you through selecting designs, optimizing placement, preserving safe zones, and practicing alignment so you can reproduce high-quality multi-design runs with confidence. Even for DIY DTF transfers, establishing repeatable steps—from file preparation and color separation to proper curing and powdering—helps you scale up without sacrificing color accuracy or adhesion. To maximize output, try a multidesign gangsheet approach that groups related graphics on one sheet, minimizes waste, eases cutting and transfer, and keeps safe zones in place for clean, repeatable results.
Beyond the first look, this practice translates into batch-ready transfer sheet planning, where multiple motifs are tiled on one film to cut production time. It reads like layout engineering for apparel decoration, using a grid system to speed placement, stabilize color output, and streamline the post-print finishing. Think of it as a design mosaic on a single sheet – the same workflow ideas you will find under transfer printing guides and optimization principles when you are aiming for efficiency and repeatability.
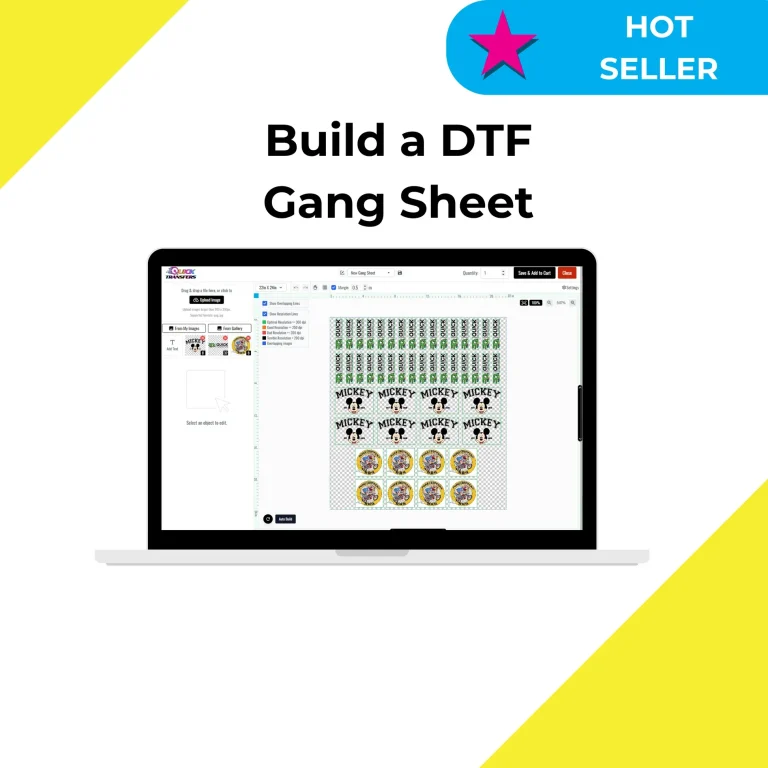
1) DTF Gangsheet Building Essentials: Planning for Speed and Quality
In the world of DTF printing, getting a reliable gangsheet setup starts with clear planning. When you know how many designs will fit on a sheet, the sheet size, and the margins you’ll enforce, you set the stage for fast, repeatable production. This focus on early decisions is a core part of DTF gangsheet building and helps ensure that every transfer lands with consistent alignment and legible designs. If you’re aiming for a 30-minute workflow, the planning phase is where you save minutes later by avoiding reworks and misplacements.
Think in terms of a grid-based layout and a simple set of constraints: fixed design dimensions, uniform margins, and a predictable heat press window. This approach aligns with the practical guidance you’ll find in a DTF printing guide and is echoed in many gangsheet tutorials. By establishing a repeatable plan from the outset, you reduce decision fatigue and create a solid blueprint that scales from a two-design run to a multidesign gangsheet without sacrificing quality.
2) Mastering Gangsheet Layout: Grid, Margins, and Multidesign Arrangements
A clean gangsheet starts with a precise layout. Create a grid that matches your sheet dimensions, then snap each design into the grid with identical margins. The result is a visually balanced gangsheet where every element has room to breathe and no design competes with another during transfer. This grid-driven mindset is a cornerstone of successful gangsheet layouts and is frequently highlighted in gangsheet tutorial resources.
As you experiment with multiple designs, consider how the designs relate in size and contrast. A multidesign gangsheet benefits from consistent asset dimensions and scalable artwork to prevent cropping or color bleed. This principle also mirrors what you’ll see in broader DTF printing guides, where grid accuracy and alignment guides reduce errors and speed up production during the heat press workflow.
3) Asset Preparation and Color Management for a Reliable DTF Printing Guide
Before you print, verify every design’s resolution, file format, and color readiness. A well-prepared asset avoids last-minute conversions that can introduce color shifts or pixelation. In the context of a DTF printing guide, you’ll find emphasis on exporting at high resolution (commonly 300 dpi), placing designs in a unified color space, and ensuring that fonts are outlined or embedded. This careful preparation pays dividends in color fidelity on transfer.
Color management is where many projects stumble, so prepare ICC profiles and color channels early. When exporting the gangsheet, keep a consistent color workflow so you aren’t adjusting profiles mid-run. The same attention to color integrity is central to guiding DIY DTF transfers toward predictable results, and it reinforces the idea that a strong foundation in asset preparation makes every subsequent step smoother.
4) Print, Powder, and Cure: A Practical Heat Press Workflow
Printing on PET film and applying adhesive powder are the hands-on steps that move your plan from digital to tangible. Set your printer with the correct mirror settings and ensure proper alignment before starting the main batch. This phase integrates with the heat press workflow by pairing accurate print output with timely powdering and curing so the transfer adheres cleanly to fabric.
Curing and transfer require consistent heat and pressure. A well-timed preheat or controlled curing cycle helps prevent smudges and uneven finishes. Following a steady heat press workflow minimizes idle time between steps and supports repeatable results across multiple garments. When you optimize these stages, you’ll notice faster setup, fewer rejects, and improved color consistency in every transfer.
5) Troubleshooting and Quality Control for DIY DTF Transfers
No production process is perfect on the first try. Begin with a quick visual inspection of the gangsheet before printing, then perform a test transfer to catch misalignments, color gaps, or edge issues. This proactive troubleshooting mindset is a hallmark of DIY DTF transfers and helps prevent waste when working with limited startup materials.
A practical QC checklist covers alignment, color fidelity, adhesion, and fabric compatibility. After each run, compare results to your expected outcomes and adjust the layout grid, color profiles, or curing times as needed. Regular test transfers keep you aligned with your quality standards and reduce the risk of surprises in larger batches.
6) Scaling Up: Templates, Automation, and a Repeatable Multidesign Gangsheet Process
Once you’re confident with a single gangsheet, you can scale by creating reusable templates and standardized workflows. Templates enforce fixed margins and grid placements, letting you reproduce high-quality gang sheets for multiple designs quickly. This approach aligns with multidesign gangsheet strategies and mirrors the efficiency gains discussed in broader printing workflows.
Documentation and iteration are your friends as you grow. Keep notes on sheet size, design counts, color profiles, and transfer settings so you can reproduce successes and learn from any missteps. As you expand to more complex runs, the repeatable process you cultivate now will support smoother DIY DTF transfers and more reliable results across small-batch orders.
Frequently Asked Questions
What is DTF gangsheet building and why is it essential in a DIY DTF transfers workflow?
DTF gangsheet building is the practice of arranging multiple designs on one printable sheet for transfer to garments. It boosts efficiency by allowing a single print run to cover several designs, improves consistency across outputs, and reduces setup changes. This approach aligns with a smooth heat press workflow and helps beginners achieve reliable, professional results quickly through a grid-based layout with margins and safe zones.
How can I plan a DTF gangsheet within a 30-minute window using a gangsheet tutorial approach?
Follow a concise 30-minute plan: 0-5 minutes for design selection and sheet sizing, 5-12 minutes to set up a grid and place designs with equal margins, 12-18 minutes to export print-ready assets, 18-24 minutes to prep the film and verify alignment, 24-28 minutes to apply powder and do a quick cure, and 28-30 minutes to run a transfer test and wrap up. This mirrors a practical gangsheet tutorial focused on speed without sacrificing quality.
What tools and materials are required for efficient DTF gangsheet building according to a DTF printing guide?
Essential tools and materials include: – DTF printer with compatible film and transfer sheets – PET film sheets for the gangsheet – Design software (Illustrator, CorelDRAW, or free tools) – Adhesive powder and a curing method (heat press or convection oven) – A heat press with adjustable temperature and timer – A ruler or grid for precise alignment – Color profile resources or ICC profiles suitable for your printer and film – Basic test material (scrap garments) for dry runs.
What common mistakes should I avoid in DTF gangsheet building and how can a multidesign gangsheet layout help?
Avoid rushed layouts that ignore margins and safe zones, inconsistent design sizes, poor color setup, and under‑cured powder. Always verify the grid and spacing before printing. A multidesign gangsheet layout helps maintain consistent sizes, margins, and alignment, reducing waste and preventing misalignment across designs.
How should I approach color management during DTF gangsheet building to ensure accurate transfers within a heat press workflow?
Use fixed ICC color profiles matched to your printer and film, ensure color channels are prepared correctly, and export at a suitable resolution (typically 300 dpi) with the correct transfer settings. Run a test print on film to verify density and color before the full gangsheet, then adjust printer density or profiles as needed to maintain color fidelity in the heat press workflow.
What is a practical heat press workflow for a multidesign gangsheet project in DIY DTF transfers?
Key steps: preheat the platen to a consistent temperature; print with the correct mirror settings for transfer; apply adhesive powder and cure evenly; perform a test transfer on scrap fabric to check alignment and color; transfer all designs with even pressure and the set time; evaluate results and adjust settings before full runs to ensure reliable outcomes across the gangsheet.
| Aspect | Key Points |
|---|---|
| Purpose of DTF gangsheet building | Maximize designs per sheet, speed production, maintain quality; beginner-friendly; achievable in ~30 minutes; plan, layout, print, troubleshoot; smooth heat press workflow and accurate color results. |
| What is a DTF gangsheet? | A single printable sheet holding multiple designs; print batch and transfer multiple designs in one pass; saves time, reduces setup changes, improves consistency. |
| Core principles | Maximize designs per sheet without compromising legibility or quality; maintain margins and safe zones; use a grid-based layout; prepare designs with consistent dimensions; plan heat press workflow early. |
| Tools and materials | DTF printer, PET film, design software, adhesive powder, curing method, heat press, ruler/grid, color profiles/ICC, test materials. |
| 30-minute plan (high-level) | 0-5: design selection; 5-12: layout setup; 12-18: prepare assets; 18-24: print setup; 24-28: powdering; 28-30: transfer test and wrap-up. |
| Step-by-step workflow (summary) | Prepare designs; create gangsheet layout; export with correct settings; print and verify; powder and cure; transfer and test. |
| Speed and consistency tips | Reusable templates; consistent design sizes; predefined color profiles; print-and-transfer checklist; workflow log. |
| Common mistakes | Rushed layouts; inconsistent designs; poor color setup; inadequate curing; skipping test transfers. |
| Quality control | Check alignment, color consistency, transfer adhesion, fabric compatibility; adjust as needed. |