DTF gangsheet builder: Beginner’s guide to getting started
DTF gangsheet builder is changing how creators plan transfers, letting you arrange multiple designs on a single sheet with greater precision, less waste, and faster turnarounds. For those new to DTF, this tool translates complex design layouts into a practical, print-ready plan that aligns margins, palettes, and film settings. A thoughtful approach to plan designs on the sheet—visualizing placement, keeping consistent padding, and accounting for bleed—helps ensure consistent results across batches. If you’re learning to operate the gangsheet tool, you’ll gain a repeatable workflow that reduces setup time and minimizes misprints. Together, these steps support smoother DTF printer setup as you scale.
From a semantic perspective, this tool acts as a planning assistant that coordinates several designs into a cohesive transfer sheet. It prioritizes color harmony, margins, and file preparation, helping you build reusable templates that adapt to different sheet sizes. By aligning prepress steps with the printer’s capabilities, operators can achieve more reliable results and a steadier production rhythm. As you gain experience, automation options and calibrated profiles can further streamline the workflow and expand capacity.
DTF Printing Basics and the DTF Gangsheet Builder
DTF printing basics cover more than just choosing a printer and inks. Understanding substrates, transfer films, curing times, and color management sets the foundation for successful gangsheet layouts. When you pair these fundamentals with a DTF gangsheet builder, you gain a planning tool that helps you maximize the number of designs per sheet while preserving color accuracy and print quality. This alignment between practical DTF printing knowledge and smart layout planning is what makes the builder an essential part of your workflow.
How to use a gangsheet builder becomes a natural extension of DTF printing basics. You’ll import designs, define the sheet size, and set margins and spacing so every design fits cleanly. This approach not only reduces material waste and setup time but also supports consistent margins and reliable color reproduction across multiple designs. By integrating DTF workflow optimization concepts and ensuring proper DTF printer setup along the way, you’ll streamline production from the first job.
Gangsheet Layout Best Practices for Efficient DTF Workflows
A strong gangsheet layout goes beyond cramming designs onto one sheet. It balances efficiency with quality by applying best practices such as consistent margins, bleeding allowances, and color-aware placement. Grouping related designs and standardizing templates helps maintain uniformity across jobs, which aligns with DTF printing basics and makes scaling easier. Effective gangsheet layout also supports smoother post-press steps, reducing the risk of misprints and edge artifacts.
For beginners, a practical approach to gangsheet layout includes defining a template-driven workflow and using color profiles to keep output predictable. Start by setting the sheet size and spacing rules, then arrange designs with a grid or logical groupings, keeping in mind the color families and required trims. As you gain experience, you can explore advanced tips for DTF workflow optimization, such as automation features in your gangsheet builder and tighter integration with DTF printer setup to ensure repeatable results across batches.
Frequently Asked Questions
What is a DTF gangsheet builder, and how does it improve gangsheet layout and DTF workflow optimization?
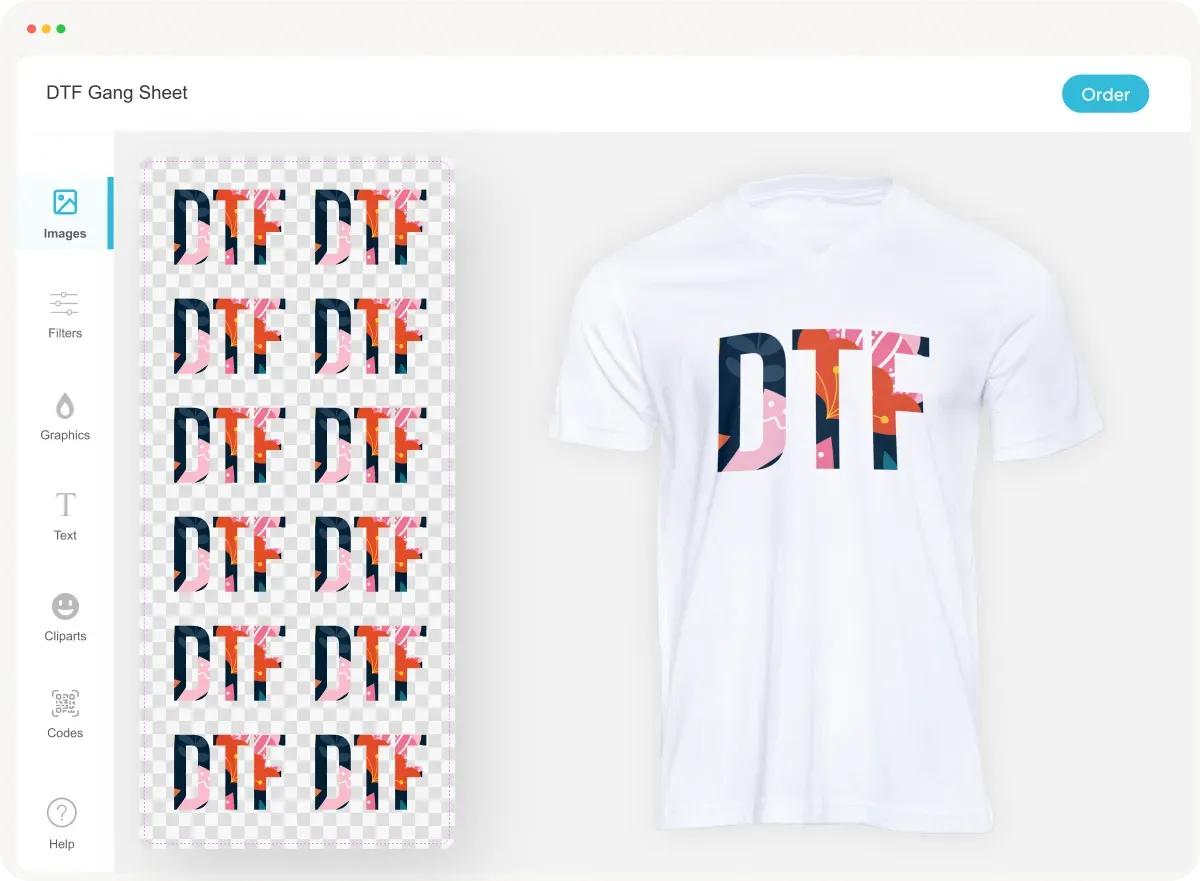
A DTF gangsheet builder is software that lets you place multiple designs on a single transfer sheet before printing. It optimizes the gangsheet layout by maximizing the number of designs while preserving margins, bleed, and color fidelity. Using it supports DTF workflow optimization: less waste, faster pre-press, and consistent color management across designs. For beginners, import your designs, set the sheet size, and apply templates to standardize layouts.
How can I get started with the DTF gangsheet builder for proper DTF printer setup and efficient layout?
To get started with the DTF gangsheet builder, begin with proper DTF printer setup—verify the printer, transfer film, and curing steps are ready. Then define your sheet size and layout rules, import designs, and arrange them on a grid for the gangsheet layout. Use color profiles and previews to ensure accurate output, and export a print-ready file. If you’re asking how to use a gangsheet builder, start with templates and gradually adopt batch placement to speed up future jobs.
| Aspect | Key Points |
|---|---|
| What is a DTF Gangsheet Builder and Why It Matters | A DTF gangsheet builder is software that lets you arrange multiple designs on one sheet before printing, maximizing prints while preserving color accuracy, margins, and print quality. |
| Key Benefits |
|
| DTF Printing Basics |
|
| Gangsheet Layout Best Practices |
|
| Step-by-Step Guide (Beginners) |
|
| Practical Tips for Workflow Optimization |
|
| Common Mistakes to Avoid |
|
| Advanced Tips for More Efficiency |
|
Summary
DTF gangsheet builder is a powerful tool for beginners and professionals alike in direct-to-film printing. By embracing thoughtful layout practices, consistent color management, and template driven workflows, you can reduce waste, speed production, and deliver consistent high quality transfers. This descriptive overview highlights how to get started, what to prioritize, and how to scale up with confidence, ensuring your DTF business remains competitive and creative.